Pages

Wednesday, August 29, 2012

Bombshell Stamps August Blog Hop

If you are looking for the Craftwell Back To School Blog Hop, please click here!

Welcome to the Bombshell Stamps August Blog Hop! 

And did you know that this month is the 5th Anniversary of Bombshell Stamps?!  Be sure to link up to the challenges at their blog because you don't have to use just Bombshell Stamps, it's anything goes this month!

You should have hopped on over here from Terra's Blog, so if you are just starting out here, please make sure to start on over at the Bombshell Stamps Blog and hop on all the way through the list.  Trust me, this is one hop you won't want to miss!

So this month, Alison picked the theme "Let's Hear It For The Boys".  Yep, that song has definitely been stuck in my head for the past month.  We could interpret this however we wished, so I decided to make a wall hanging and necklace for a guy. 

Wall Hanging with Speed Shop Stamp Set - Cardstock by Bo Bunny
This wall hanging has some dimension to it (it's me, of course it has some pop-dots underneath something, somewhere!).  So the pop dots are underneath all 3 middle layers (the writing, quote and hot rod), which you can't tell from the picture.  The skulls and hot rod were colored with colored pencils.  There's also a layer of cardstock underneath the blue argyle.  All cardstock and the quote is from Bo Bunny.  This is actually the first time I have used this particular hot rod stamp.  It was begging to be inked up!

Dog Tag Necklace made with Skull Stamp from Speed Shop Stamp Set
The skull stamp was stamped onto a metal dog tag with black Staz-On Ink.  After it dried, I attached a jump ring and ball chain and voila! A necklace any guy can rock out!  

Your next stop is at Stempelientje's Blog to see what awesome project she has created!! 

Thanks for hopping with us! And don't forget to link up your creations at Bombshell Stamps Challenges - Ms. August's Challenge and the August Sketch Challenge!   Anything goes this month, link up your version of the challenge using ANY stamp set for your chance to win a free Bombshell Stamp Set of your choice! 

- Kim

Full Hop List:
Bombshell Blog: http://bombshellstamps.blogspot.com/
Alison: http://alisonsrandomthoughts.blogspot.com/
Alex: http://www.paperandstring.blogspot.com/
Rachael: http://rachaelshandmadedesigns.blogspot.com/
Alaine: http://missalaineousmosaics.blogspot.com/
Kelli: http://www.cajunstampingqueen.blogspot.com
Jodi: http://www.elamdesign33.blogspot.com/
Laura: http://craftylittlewoman.blogspot.com/ 
Sparkly Mary: http://sparkly-train.blogspot.com/
Terra: http://www.moresmearedink.blogspot.com
Kim: www.craftypinkanchor.blogspot.com  -----  you are here!
Stempelientje: http://stempelientje.blogspot.com
Nicole: http://madebynicole.blogspot.com
Glittery Katie: http://ferrishyn-frontier.blogspot.com
Kas: http://www.artloveschaos.blogspot.com
Kathi: http://kathstales.blogspot.com

Monday, August 27, 2012

Back to School Blog Hop

Welcome to the Craftwell Back to School Blog Hop!
 
I hope you are enjoying the hop so far!  You should have come from Kelly's Blog.  If you have just started here at Crafty Pink Anchor, please make sure you start from the beginning at Cassie's blog, so you don't miss any of the awesome projects along the way!  
 

This school year, jazz up those plain ol' boring pencil boxes and folders with your eCraft and some vinyl!  Vinyl is a great way to personalize your school supplies and will definately help you stay organized in style. 


 These would also be great gifts for teachers, high school and college kids! 

First I measured the area where I knew I wanted to put the vinyl images. Then I imported the svg's I wanted into SCAL3 (or eCraft Shop Pro for the SD card images) and re-sized them according to the measurements that I had taken and cut them out with my eCraft (at pressure 1 with no tabs) out of vinyl.  Then simply peeled off the vinyl from the backing and adhered to the boxes and folders. 
 
Pencil/Marker Boxes:
All the elements for the boxes were cut out of black vinyl with my eCraft.
 
These clear boxes were purchased at AC Moore and were on sale for a dollar! What a great deal!

 
Copics Box: Copics is in SNF Ambrosia Bold by Lettering Delights. The flowers were cut out at 1 inch from Craftwell's Fundamentals 1 SD card. 
 
 
Pencil Box:  Pencils is in LD Horror Movie Font by Lettering Delights.  The stars were cut out at 1 inch and the skull and crossbones at 2 inches.  Stars, skull and crossbones are from Lettering Delights Rockstar Cut Its Simple Shapes. 
 
 
Folders:
All the elements for the folders were cut out of green vinyl with my eCraft.
 
Plain folders are boring but are sometimes the only folders left at the store!  These 2 pocket folders were purchased at Walgreens at 4 for $1.
 
Philosophy: Font for Philosophy is the Bella Donna Font that was already installed on my computer.  The lock and key are from Craftwell's Fundamentals 1 SD Card and were cut out at 4 inches.
 
 
Art:  The Art font is Planet Benson 2 which is another font that already came on my computer.  The pencils, glue, scissors, paint pallette and paint brush are from Lettering Delights Crafty Bird Cut It Set. 
 

And don't forget to comment at Craftwell's blog for your chance to win an eCraft! Please hop and don't skip!

Enjoy the rest of the hop! Your next stop is Carrie's Blog. 


- Kim  


Back to School Blog Hop Line-Up
 
Cassie Box http://www.somethingfromcassie.com/
Denise O’Connor: http://purplepaperparadise.blogspot.com/
Kelly Feldman: http://www.wannabeescrapper.blogspot.com/
Kim Gaughan: http://www.craftypinkanchor.blogspot.com
Carrie Walz http://everydaymoments-carrie.blogspot.com/
KimberlyRae Forde: http://kreationsbykimberlyrae.com/blog/
Aimee Maddern: http://aimeesarmoire.typepad.com/
Jodi Baune: http://dancingintherainjb.blogspot.com/
Debi Tullier: http://fabric-ecraft.blogspot.com/
Lowri McNabb: http://www.papervinenz.com/
Craftwell Blog: http://blog.craftwellusa.com/

Tuesday, August 21, 2012

Gold Star Treat Box - eCraft DT Tuesday

Happy Tuesday!

Fill up this cute gold star box with some treats for your kids or even for a teacher for a fun back to school treat!


Supplies:
eCraft
SCAL3
SVG Cuts Kits: Playful Parlour (star box); Back to School SVG Collection (apple and books); School Days SVG Kit (Notebook Paper 3, A+, Glasses)
Cardstock - Solid Colors - Yellow/Gold, Green, Red, White, Black
We R Memory Keepers - Love to Craft Collection - Polka Dots Paper (rulers)
Red and White Polka Dot Ribbon
Light Green Vellum
Glossy Accents
Scotch Quick Dry Adhesive


How To:
In SCAL3, import all of the pieces of the star box except for the flower from SVG Cuts Playful Parlour SVG Kit.  Cut out at the recommended sizes and adhere the box together.  For the vellum, I used a light green.

Next import and cut out the following:
- Apple and Books from Back To School SVG Collection at 2.5 inches wide. (All three layers).  Adhere together and apply glossy accents to the apply and let dry.
- From School Days SVG Kit - Notebook Paper 3 at 1.9 inches wide; A+ layers at 1.5 inches wide; Glasses at 2.5 inches wide. 
Adhere together the A+ and then adhere that to the notebook paper.  Adhere together the Glasses layers and then apply glossy accents to the lenses.  Set aside and let dry.

Wrap and adhere ribbon all around the side of the top of the box.  For the top of the star, cut out rulers from the reverse side of the We R Memory Keepers Polka  Dots Paper (I Love To Craft Collection) and cut down to the size you need for top of box.  Adhere to the top of the box per picture.  Then adhere the books with apple to the bottom left of the star, the notebook paper to the right bottom, and the glasses to the top right of the star.

Hope you enjoyed this tutorial!  If you have any questions please ask below or in the Craftwell Forum.
- Kim

Tuesday, August 14, 2012

School Days Frame - eCraft DT Tuesday

Hi Everyone!

Today's tutorial is a fun school days frame, perfect for those "1st Day of School" pictures!


Supplies:
eCraft
SCAL3
SVG Cuts - Miss Baker's Classroom SVG Kit (globe & apple), Back To School SVG Collection (crayons, handwriting, ruler), Wet N' Wild SVG Kit (pennants)
Alphabet Stickers - Making Memories Creative Letters Dot 7/16" Red
4 Mini Clothespins by Canvas Corp
Colored Cardstock - white, red, green, blue, yellow, black
Acrylic Paint in Dark Blue - My Studio (AC Moore)
Paint Brush or Sponge Brush
Square Wood Frame Unfinished - from Michael's
Mod Podge
Scotch Quick Dry Adhesive
Red and White Twine - Pick Your Plum
Pop Dots
e6000 Adhesive

How To:
Using your paint brush or sponge brush, paint 4 coats of dark blue acrylic paint onto the unfinished square wood frame.  Make sure to let each coat dry before applying the next coat. 

In between waiting for the coats of paint to dry, import the SVG's from SVG Cuts into SCAL3, resize, and cut them out with your eCraft.
- Pennants1 at 2 inches wide (these are a set of 2; cut out 5 sets so you have 10 pennants total) from Wet N Wild SVG Kit
- Handwriting at 4.25 inches wide from Back to School SVG Collection
- All Crayon layers at 1/2 inch wide from Back to School SVG Collection
- Both Ruler layers at 7 inches wide from Back to School SVG Collection
- All Globe layers at 2.25 inches wide from Miss Baker's Classroom SVG Kit
- Both Apple layers at 3 inches wide from Miss Baker's Classroom SVG Kit

Adhere all the svg pieces together with Scotch Quick Dry Adhesive.

With the Alphabet Stickers, spell out SCHOOL DAYS on the pennants and attach them to the twine and adhere so the pennants are closed onto the twine.

Once the picture frame is dry, take the handwriting svg and adhere it to the bottom of the frame with Mod Podge.  Then apply 1 coat to the entire front of the frame with Mod Podge.  After the coat of Mod Podge is dry, adhere the crayons to the left side of the frame and the ruler to the right side (see picture).  Next, adhere the apple to the bottom left of the frame and the globe to the bottom right with Pop Dots to give the frame some dimension.  Tie a double knot on each end of the twine by the first and last pennants leaving a little room to clip on a mini clothespin and then trim the ends of the twine.  Adhere the mini clothespins and pennants to the frame (as per picture) with a little bit of e6000 adhesive onto the back of the clothespins.  (I applied a small amount using a toothpick.)  (Note: this glue is a little smelly, definitely use it in a well ventilated area and follow the manufacturer's instructions).  Let the frame dry flat for 24 hours.

All that's left to do is to add a picture of your kiddo on their 1st day of school! 

If you have any questions please ask below or in the Craftwell forum!
Have a great Tuesday!

- Kim


Tuesday, August 7, 2012

DIY Back to School Notebooks - eCraft DT Tuesday

I can't believe how fast the summer has gone by and that it's almost time for school to start again!  One of my favorite things about the beginning of the school year was getting new notebooks and drawing or taping pictures to the front and back covers.  Today's tutorial is how to make your own notebook using your eCraft and a few craft tools you may have in your crafting stash.  


Supplies:
eCraft
eCraft Shop Pro
Chipboard (Cereal Boxes)
Cardstock - white
White Paper (Copy Paper) 8 1/2 x 11
The Cinch Binding Tool by We R Memory Keepers
The Cinch Binding Wires or Spiral Bindings
Wire Cutters
Pliers
Washi Tape
Scotch ATG Gun
Colored Cardstock
Xyron 5" Creative Station with Permanent Adhesive
Paper Trimmer
Silver Sharpie Marker
SVG Cuts - Miss Baker's Classroom SVG Kit  (apple, stem, banner)
Lettering Delights - Halloween Cut It's  (skull)
Font - Comic Sans MS Bold (eCraft Shop Pro Fonts)

How To:
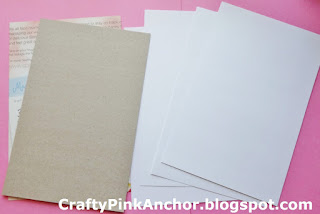
In eCraft Shop Pro, resize a rectangle to 8.5 x 5.5 inches.  Using your eCraft cut the chipboard (2 pieces for front and back of notebook) and white cardstock (you will need 4 pieces) at this size. Then adhere the white cardstock to the front and back of one piece of chipboard.  If your cardstock is on the lighter side and you can still see the decorated/printed side of the chipboard through it, you may want to cut another piece of cardstock to 8.5 x 5.5 inches and adhere this piece on top of it. 

After you have covered both pieces of chipboard (front and back) with cardstock, then take your washi tape and wrap it around the chipboard in strips.  (see pics).  For the top and bottom, you want to use half of your washi tape and wrap it around the top/bottom edge this way you won't see the cardstock/chipboard edge.  After you have wrapped washi tape all around the first piece of chipboard, do the same for the second piece.  (Note: The side of the washi tape where you have the seam, you can tape a piece of washi tape vertically to cover the seams, so it looks a little neater.  Also the seamed side will be in the inside of the notebook.)  Once both are covered set these aside.


Next take your 8.5x11 paper and cut them in half so they are 8.5 x 5.5 inches.  I used a paper trimmer for this so I could cut a few pieces at a time( and it was easier since you are just cutting the paper in half.)  Once you have cut a good amount of paper that you would like for the inside of your notebook put these to the side. 

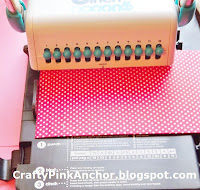
With the Cinch Binding Tool, punch holes in the cover/back chipboard pieces and also punch holes in the paper.  After you have punched the holes, use your binding wire or spiral and the machine to bind and cinch your notebook together.  Use the wire cutters to trim down the wire and the pliers to turn in the ends of the wire. 


Using your eCraft, import and cut out the apple and stem (from SVG Cuts' Miss Baker's Classroom SVG Kit) at 3 inches wide and the banner at 5.25 inches wide.  Adhere the pieces to the front of the notebook with the Xyron 5 inch Creative Station and write the teacher or student's name on the banner in the silver Sharpie Marker.

I also made these two notebooks using the same above tutorial, only instead of cutting out the apple, stem and banner, I cut out the letter K using the font Comic Sans MS Bold in eCraft ShopPro at 2.5 inches wide.  The Skull is from Lettering Delight's Halloween Cut It Set and was cut out at 3 inches wide using the eCraft and eCraft Shop Pro.


Have a great Tuesday!
-Kim