Happy Halloween Everyone!
Today is the last Wednesday of the month, which means it's time for the Bombshell Stamps Hump Day Hop! You should have arrived here from Kelli's blog. If you've just started here, please start at the Bombshell Blog so you don't miss anything!
The challenge is to create a black and white Halloween project and we are allowed to use only one additional color.
We have experienced some extremely terrible weather here on the East Coast, so not everyone may have been able to get their posts up on time. I still haven't been able to get my project up, so please check back later today when I can get it online!
Thank you for understanding!
Please hop over to Sparkly Mary's blog to see the gorgeous project she has created.
- Kim
Bombshell Hop List
Bombshell Blog: http://bombshellstamps.blogspot.com/
Alison:
http://alisonsrandomthoughts.blogspot.com/
Susie:
http://whiteribboncards.blogspot.co.uk
Alex
"Ms. October!": http://www.paperandstring.blogspot.com/
Torrey:
http://left-field-studio.blogspot.com/
Kelli:
http://www.cajunstampingqueen.blogspot.com
Kim:
http://www.craftypinkanchor.blogspot.com
Sparkly
Mary: http://sparkly-train.blogspot.com/
Alaine:
http://missalaineousmosaics.blogspot.com/
Emily:
http://www.bombshellemsartisticexpressions.blogspot.com
Glittery
Katie: http://ferrishyn-frontier.blogspot.com
Jodi:
http://www.elamdesign33.blogspot.com/
Christine:
http://happyscrapper-sweetpeacards.blogspot.com
Stempelientje:
http://stempelientje.blogspot.com
Jenn:
http://www.stampinangeljenn.blogspot.com/
Rachael:
http://rachaelshandmadedesigns.blogspot.com/
Mari:
http://mariscreativerazzledazzle.blogspot.de/
Kathi:
http://kathstales.blogspot.com
Wednesday, October 31, 2012
Sunday, October 28, 2012
Come hop along!
Welcome! You should have arrived here from Kelli's blog. If you've just started here, We are showcasing the two newest Bombshell Stamp Sets - Indian Princess and Indian Warrior - so please start at the Bombshell Blog so you don't miss out on anything! These new stamps are gorgeous and a lot of fun to create with.
Here's the card I made using Indian Warrior:

The banner I used is from the Banner Sayings Stamp Set and I hand wrote 'Thank You' in black marker. I was going to color in the Indian Warrior and banner with Copics, but after my black Copic marker leaked all over my hand, I opted for colored pencils. Boy, is it hard to remove Copic marker ink from your skin!
Your next stop on the hop is to Katie's Blog. Thanks for stopping by here and don't forget to check out the newest stamps after you've finished the hop!
- Kim
Blog Hop List
Bombshell Blog
Kelli
Kim
Katie
Mary
Alison
Susie
Alaine
Jodi
Torrey
Kathi
Saturday, October 27, 2012
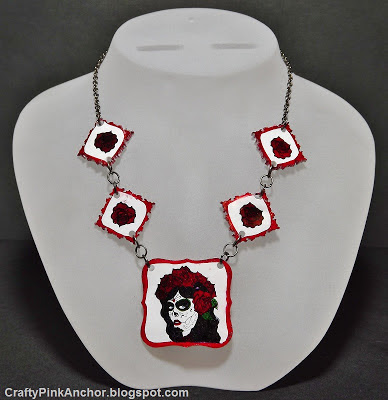
A Bombshell Secret has been let out!
If you haven't seen it yet, I have a tutorial up on the Bombshell Stamps Blog, for this Senora Muertas Necklace!


Oh, what's that? You're still wondering about the Bombshell Secret? If you haven't heard already, Bombshell Stamps has released 2 new fabulous stamp sets! Indian Warrior and Indian Princess. These sets are beautiful!
I made a card using Indian Warrior:

And earrings using the feathers from Indian Princess:

Check out the Bombshell blog post to see some gorgeous projects made with these new stamp sets!
If anyone out there is in the path of Hurricane Sandy or Frankenstorm, please stay safe!
- Kim
Wednesday, October 24, 2012
One more week....
until Halloween!!!!!!! Yay!!!
Lately I have been on a little bit of a vinyl kick. I'm really loving how easy and fun it is to use! I also have been using glossy accents a whole lot. So today, I have two projects to share, one using vinyl and the second using glossy accents.
I love vintage Halloween items and decor, as I've said a few times before. Earlier this year, when SVG Cuts released their Midnight Jamboree kit, I was ecstatic and in love! Everything in the kit is so gorgeous! It's seriously one of my favorite kits that they put out.
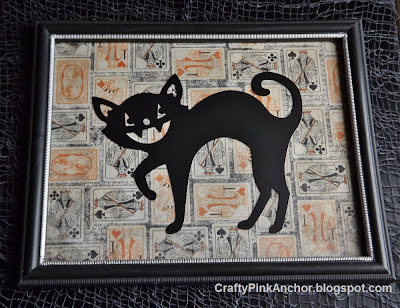
Supplies:
-Silhouette Cameo
-SVG Cuts - Midnight Jamboree Kit
-Silhouette Scraper
-8.5 x 11 inch frame from the local dollar store
-piece of 12x12 black vinyl
-piece of 8.5 x 11 inch paper - I used the card patterned paper from Authentique's Enchanted Collection
First, I cut a piece of 12x12 paper down to 8.5 x 11, opened the back of the frame and put in the paper as you would put in a picture. I then closed the frame.
In SCAL 3, I imported the happy cat silhouette and resized the height to 6 inches. Then I loaded the black vinyl into my Silhouette Cameo and cut it out.
Next I placed the cat silhouette cut out onto the middle of the top of the frame and smoothed it out using the Silhouette scraper.
I didn't use transfer paper, but feel free to! While I haven't used transfer paper at all (ever) yet, I've heard it's easy to use and makes vinyl life so much simpler.
Isn't this a cute and easy Halloween decoration for your mantle decor?! I think the hardest part was choosing what background paper to use!
Over at the Bombshell Stamps Blog there's a fun challenge going on. Basically, you find one of the Friday Bombshell Tutorials you like and create a project based on it! It was a tough decision to narrow down to the one tutorial I wanted to do, but I decided on using my glossy accents and the "You're So Magnetic" Tutorial that Alaine posted last year.
Here are my Halloween Leaf Magnets:

Now, the most fun part!
You can click the above two links and at the first link learn more about the challenge and also link up your project based on one of the tutorials for a chance to win a free Bombshell Stamp Set! You can also search for tutorials you may want to try.
Or you can click the second link and see the details on how these magnets were made - I followed Alaine's tutorial to make them!
Supplies:
-Bombshell Stamp Sets - Sugar Skulls, Classic Tattoo, Love & Luck
-eBosser by Craftwell
-Spellbinders Shapeabilities Nested Maple Leaves - Small and Medium Sized Dies
-Embossing Folders - Halloween Night by Tim Holtz/Sizzix; Divine Swirl and Skeleton Scroll by Cuttlebug/ProvoCraft
- Bazzill Cardstock
- Glossy Accents
- Copic Markers
Happy Halloween Craftin'!
- Kim
Tuesday, October 23, 2012
Heart Necklace made from Shrink Plastic!
Halloween is almost here and I am still craftin' things for it! As I said a few weeks back in my skull bracelet tutorial, I am loving creating jewelry with my eBosser.
Today's tutorial is for a creepy necklace that's easy to make, and would be a great accessory for a witch costume!

Supplies
-Cooler Concepts Shrink Film
-printer and ink
- Dictionary and Green Floral Digital Papers from The Chillingsworth Manor Collection by Echo Park (Available at JessicaSprague.com)
- Happy Halloween 3"x3" Combo Die and Embossing Folder by ProvoCraft Cuttlebug (I just used the die, not the embossing folder)
- eCraft and circle basic shape or 1 inch hole punch
- 1/4" circle hand (hole) punch (Mine are by Fiskars)
- 9 6mm jump rings
- 9 6mm jump rings
- 1 lobster claw clasp
- Flat-nose pliers
- Needle-nose pliers
- Embossing Heat Gun
- Flat-nose pliers
- Needle-nose pliers
- Embossing Heat Gun
- Jewelry Chain
First, I printed the Dictionary and Green Floral Digital Paper from the Chillingsworth Manor Collection onto the Shrink Film by Cooler Concepts and let it dry.
Next, I cut out the heart section of the dictionary paper (vertically) with the die shape from the Happy Halloween 3"x3" Combo Die and Embossing Folder by ProvoCraft. I then punched holes in the top with my 1/4 inch hole punch.
Using my eCraft, I cut two 1 inch circles out of the Green Floral digital paper. Using the 1/4 inch hole punch, I punched a hole on one side of the circle, and then another hole directly across from it.
Then I shrank all of my cut out shapes with my embossing heat gun. After they were cooled down, I attached the shrink film charms together with jump rings and attached them to chain, adding a clasp and jump ring at the ends.

I hope you enjoyed this tutorial!
If you have any questions please ask below.
Are you using your eBosser to create spooky jewelry for Halloween!? I'd love to hear!
- Kim
Monday, October 22, 2012
Skeleton Shaker Card
Happy Monday!
Today is the 3rd Muse Monday at Bombshell Stamps Blog. If you haven't seen the last 2 Monday's inspiration, I definitely recommend checking those blog posts out too!
So, since it's still October, the Muse Set is still Calaveras Fiesta. I've said it before and I'll say it again... I *loooooove* this stamp set! I love skulls and skeletons and this set features 2, that's right - not 1 but 2 skeleton stamps! And there's also some fun hats in this set that you can put on them!
Here's a card I made with this set:

So, the skeleton laying down was stamped in Tsukineko Memento Ink in London Fog, colored with Copics and fussy cut out with scissors. I think if I made this card again, I'd stick with the Tuxedo Black ink because I feel that this skeleton is a little too light for this card.
For the middle of the card, I used my eBosser and a die to cut out the shape. The orange and purple flowers are Spellbinders dies that were also cut with the eBosser.
The waving skeleton was stamped on clear acetate with Staz-On Ink in Jet Black. (I just reused a little piece of plastic packaging I had. ) I used the purple and orange pumpkin cut outs from the Spellbinders die and put them behind the skeleton to make a little shaker card. (Here's a past tutorial on how I did the shaker part.)

Please take a look at some other great inspiring projects using this set over at the Bombshell Stamps Blog!
Supplies I used:
Bombshell Stamps - Calaveras Fiesta
Tsukineko Memento Ink in London Fog
Staz-On Ink in Jet Black
Copic Markers
Spellbinders Pumpkin Circles Nestabilities Die
Happy Halloween Die by ProvoCraft
eBosser by Craftwell (electronic embossing machine)
cardstock
ribbon
black pearl bling
Thanks for checkin' out my card!
Have a crafty day!
- Kim
Today is the 3rd Muse Monday at Bombshell Stamps Blog. If you haven't seen the last 2 Monday's inspiration, I definitely recommend checking those blog posts out too!
So, since it's still October, the Muse Set is still Calaveras Fiesta. I've said it before and I'll say it again... I *loooooove* this stamp set! I love skulls and skeletons and this set features 2, that's right - not 1 but 2 skeleton stamps! And there's also some fun hats in this set that you can put on them!
Here's a card I made with this set:

For the middle of the card, I used my eBosser and a die to cut out the shape. The orange and purple flowers are Spellbinders dies that were also cut with the eBosser.
The waving skeleton was stamped on clear acetate with Staz-On Ink in Jet Black. (I just reused a little piece of plastic packaging I had. ) I used the purple and orange pumpkin cut outs from the Spellbinders die and put them behind the skeleton to make a little shaker card. (Here's a past tutorial on how I did the shaker part.)

Please take a look at some other great inspiring projects using this set over at the Bombshell Stamps Blog!
Supplies I used:
Bombshell Stamps - Calaveras Fiesta
Tsukineko Memento Ink in London Fog
Staz-On Ink in Jet Black
Copic Markers
Spellbinders Pumpkin Circles Nestabilities Die
Happy Halloween Die by ProvoCraft
eBosser by Craftwell (electronic embossing machine)
cardstock
ribbon
black pearl bling
Thanks for checkin' out my card!
Have a crafty day!
- Kim
Thursday, October 18, 2012
Going a little batty....
Bats aren't just for Halloween...
You know I am totally going to wear this necklace during the rest of the year.

As soon as I saw this bat I was in love with it! Look at it! It's creepy and spooky and so unique looking compared to most bats you see. It's from SVG Cuts Twilight Fairies SVG Collection.
I cut out this svg 4 times at 4 inches wide (hey, I like big necklaces, ok?!) in black Bazzill cardstock with my Silhouette Cameo. Then I used Mod Podge to glue each layer together, and also a layer of mod podge on the front and back. Once everything was dry (yes, this was done in stages), I then attached 2 eyelets onto the wings. Next, I used Glossy Accents on the top and let that dry overnight. Once that was dry, I added my chain and clasp and voila! A very batty necklace!

Thanks for taking a look!
- Kim
Wednesday, October 17, 2012
Ms. October's Challenge @ Bombshell Stamps
Hi Everyone!
Ms. October's Pin-Up, Alex, has challenged everyone to make a project using some bling, glitter, shimmer or shine using purple, black, orange or green. Talk about fun!!!
Ok, so I challenged myself with this card and did two things I don't normally do....

1 - I didn't fussy/fancy cut out the stamped image. Super strange for me. I miss my scissors...
2 - I didn't use a single pop dot. Gasp!!!! Yes, you heard me right. Not.a.single.pop.dot.
This card was really hard for me to create since I challenged myself not to do/use those two above things. Don't worry, I won't be making this a habit! ;-)
I used Rose's Portrait Stamp Set by Bombshell Stamps. Go check it out!
And don't forget to head on over to the Bombshell Stamps Blog to check out all of the gorgeous awesome projects all of the Bombshell Girls and Pin-Ups created for this challenge! And link up your take on this challenge!!!
Have a Wicked Wednesday!
- Kim
Tuesday, October 16, 2012
Spider Trick Or Treat Bag
It's Tuesday! Time for a Craftwell eBosser project!
Using Cooler Concepts Dark T-Shirt Transfer Film, some digital paper by Lori Whitlock and the eBosser, I created a cute Halloween design on a small tote bag.

Supplies:
-eBosser
-eCraft / Paper Trimmer
-Cooler Concepts Dark T-Shirt Transfer Film
-Digital Paper - Halloween Paper 04 and Halloween Paper 19 from Happy Halloween Digital Paper by Lori Whitlock - JessicaSprague.com
-Pumpkin Circles Nestabilities Dies - Spellbinders
-Vintage Market Decorative Strip Alphabet Die - Tim Holtz / Sizzix
-Printer/Ink/Computer
-Iron
-Fabric/ribbon/sewing machine/thread (or already made cotton bags)
First I sewed a 6 1/2 inch by 6 1/2 inch little tote bag from purple broadcloth fabric and attached some candy corn printed ribbon for handles. (If you aren't a sewer or need to make a bunch of these, you could always buy pre-made cotton bags and use the transfer paper on it as well.)
Next I printed Halloween Paper 04 and Halloween Paper 19 (from the Happy Halloween Digital Paper Kit by Lori Whitlock that I purchased at JessicaSprague.com) onto Cooler Concepts Dark T-Shirt Transfer Film. After the papers were dry, I took the striped paper and using a paper trimmer (you can also use the eCraft) cut it down to 4 1/2 by 4 1/2 inches and ironed it on to the front of my bag per Cooler Concepts instructions. I used one of the Pumpkin Circles Nestabilities Dies to cut out the spider from the green printed paper with my eBosser and ironed it on top of the striped pattern that I already ironed on top of the bag.

Using the Vintage Market Decorative Strip Alphabet Die, I cut out the words Trick Or Treat from the green patterned transfer film with my eBosser and ironed them on to the back side of the bag.

These bags are really easy to create, but if you use pre-made bags these would by lightning fast to make! Which is especially great if you are making them as gift bags for your child's class Halloween party or neighborhood children.
- Kim
Monday, October 15, 2012
Monday, Monday, Monday...
Hi Everyone!
It's Muse Monday over at Bombshell Stamps!
Calaveras Fiesta is the stamp set we are showing off, so please head on over and check out the Bombshell Stamps Blog too.
I made a card and some flower hair clips with this fabulous stamp set.


Thanks for looking! And don't forget to head over to the Bombshell Stamps Blog today and every Monday this month to see what else you can do with the Calaveras Fiesta Set.
- Kim
Wednesday, October 10, 2012
Bombshell Stamps October Sketch Challenge
It's time for the Bombshell Stamps October Sketch Challenge!
Here's this month's sketch:
I was tempted to create a card with this sketch, but then I thought, hmmm... let's make some Bombshell Framed Art for Halloween! So, I cut down a piece of cardstock to 8 1/2 x 11, created a scene based on the sketch and popped it in a frame.

I used two Bombshell Stamp Sets for this sketch: Calaveras Fiesta and Holiday Accessory. These are both newer stamp sets for me and I have to say, they are both a lot of fun to use!
Calaveras Fiesta comes with 2 skeletons, some great hats, drink stamps and a banner stamp.
Holiday Accessory is just what the name says (accessories for the holidays yay!). I will definately be using this set a lot because it can be combined with a bunch of different stamp sets. I'm also thinking the cauldron can be used for a pot of gold!
Cardstock and "You put a spell on me" sticker is the Enchanted Collection by Authentique. Spider web border sticker is by Recollections.
 |
| Close-Up!
|
And don't forget to try out this sketch using your Bombshell Stamps and link it up at the blog for your chance to win a stamp set!
- Kim
Tuesday, October 9, 2012
Skull Bracelet - Craftwell DT Tuesday
Hey Everyone!
As much as I'm lovin' using embossing folders in the eBosser, I'm really lovin' using all those cutting dies I have lying around! I have to admit, they were just sitting around waiting to be used for a long while.
After I got my eCraft a whole new SVG world opened up to me and I basically just ditched my cutting dies. But not anymore! I've picked them back up (and bought a few new ones ;-) lol) and got them ready to use in my eBosser!
Good thing the eBosser lets me use the cutting dies I already own, because the die I used in this project is one of my favorites! This skull and crossbones bracelet was made using the Beware Cuttlebug Cut & Emboss Die by ProvoCraft and shrink film from this month's sponsor, Cooler Concepts.

Now let's get to craftin' some Halloween jewelry!
(Or if you love skulls like I do, let's get to craftin' a cool bracelet you might wear year round...)
Supplies:
eBosser by Craftwell
Beware Cuttlebug Cut & Emboss Die by ProvoCraft
Shrink Film (Cooler Concepts)
1/4" circle hand (hole) punch (Mine are by Fiskars)
13 8mm jump rings
6 6mm jump rings
1 lobster claw clasp
Flat-nose pliers
Needle-nose pliers
Embossing Heat Gun
scissors
(Note: This bracelet is about 8 inches long)
First with my scissors, I trimmed down shrink film to the size of my die.
Then I powered on my eBosser and stacked the platforms - A platform on top, then shrink film, then Cuttlebug die (with foam facing up), then the C platform, and the D platform on the bottom. There is a video on the Craftwell blog if you need help with the stack for this die (click here). Then I ran it through my eBosser. I repeated these steps 5 more times. You will need 6 skull and crossbones total for this bracelet. (Depending on the size of your wrist, you may need use more or less skulls or even use different size jump rings.)

Next, using my 1/4" hole punch, I punched holes in the 4 crossbones making sure to not get too close to the edge because I didn't want the hole to rip through.
 Next, using an embossing heat gun, I carefully shrank the skull and crossbone shrink film in a well ventilated area. It curled up and twisted together, but then straightened itself out. I did this for all 6 skull and crossbones, being careful to not burn myself and to take breaks in between skulls as my heat gun would get really hot, so I would definately recommend letting it cool down in between.

Using my pliers, I opened an 8mm jump ring by twisting it (you don't want to pull it apart) and attached 2 of the crossbones at the top holes. Then closed the jump ring by twisting it back until it was closed. I also did the same for the bottom holes. 2 skull and crossbones are now attached together. (See below pictures)

 Then I attached all 6 skull and crossbones together.
At the one end I attached a 6mm jump ring to the top and bottom crossbones. Then I attached those 2 jumprings together with an 8mm jump ring and then attached a 6mm jump ring. Then I attached another 8mm jump ring. (See picture below).


As much as I'm lovin' using embossing folders in the eBosser, I'm really lovin' using all those cutting dies I have lying around! I have to admit, they were just sitting around waiting to be used for a long while.
After I got my eCraft a whole new SVG world opened up to me and I basically just ditched my cutting dies. But not anymore! I've picked them back up (and bought a few new ones ;-) lol) and got them ready to use in my eBosser!
Good thing the eBosser lets me use the cutting dies I already own, because the die I used in this project is one of my favorites! This skull and crossbones bracelet was made using the Beware Cuttlebug Cut & Emboss Die by ProvoCraft and shrink film from this month's sponsor, Cooler Concepts.

Now let's get to craftin' some Halloween jewelry!
(Or if you love skulls like I do, let's get to craftin' a cool bracelet you might wear year round...)
Supplies:
eBosser by Craftwell
Beware Cuttlebug Cut & Emboss Die by ProvoCraft
Shrink Film (Cooler Concepts)
1/4" circle hand (hole) punch (Mine are by Fiskars)
13 8mm jump rings
6 6mm jump rings
1 lobster claw clasp
Flat-nose pliers
Needle-nose pliers
Embossing Heat Gun
scissors
(Note: This bracelet is about 8 inches long)
First with my scissors, I trimmed down shrink film to the size of my die.
Then I powered on my eBosser and stacked the platforms - A platform on top, then shrink film, then Cuttlebug die (with foam facing up), then the C platform, and the D platform on the bottom. There is a video on the Craftwell blog if you need help with the stack for this die (click here). Then I ran it through my eBosser. I repeated these steps 5 more times. You will need 6 skull and crossbones total for this bracelet. (Depending on the size of your wrist, you may need use more or less skulls or even use different size jump rings.)

Next, using my 1/4" hole punch, I punched holes in the 4 crossbones making sure to not get too close to the edge because I didn't want the hole to rip through.


Using my pliers, I opened an 8mm jump ring by twisting it (you don't want to pull it apart) and attached 2 of the crossbones at the top holes. Then closed the jump ring by twisting it back until it was closed. I also did the same for the bottom holes. 2 skull and crossbones are now attached together. (See below pictures)


At the one end I attached a 6mm jump ring to the top and bottom crossbones. Then I attached those 2 jumprings together with an 8mm jump ring and then attached a 6mm jump ring. Then I attached another 8mm jump ring. (See picture below).

For the other end, I attached 2 6mm jump rings to the top and bottom crossbones and attached those 2 together with an 8mm jumpring. Then I attached a 6mm jumpring to a lobster claw clasp and attached it to the 8mm jump ring. (See below picture.)

And there you have it! A Skull-rific bracelet ready to wear for Halloween (or any day really!).

I hope you enjoyed this bracelet tutorial! If you have any questions please ask below!
Have a Happy Tuesday!
- Kim
Monday, October 8, 2012
A Look Back... and some eCraft news!
It has been a year since I first got my eCraft electronic machine. A year! Time really does fly.
At first when I got it, I really didn't know what I was doing. Seriously. I had a Cricut Expression and was used to a mat and using cartridges, so using no mat (and eCraft Shop Pro and SCAL3 and SVG's) was really different for me. But, before long, (and thanks to Denise's tutorials and videos!) I was up and running and creating with my new eCraft.
So I thought I would share one of my first projects I made with my eCraft last October. It was a Halloween project (of course!). I took the crate from SVG Cut's Caramel Apple Pie Kit and made it into a Poison Apple Crate!


Crate svg from Caramel Apple Pie SVG Kit - svgcuts.com
Skull svg from Hazel's Wicked Witch Crafts SVG Collection - svgcuts.com
Glitter Alpha Letters - Kelly Panacci Halloween Alphabet Chipbox by K and Company
Black Cardstock - The Paper Company
White Glitter Cardstock - unknown
Patterned Cardstock - Ravenhead Manor Scrapbook Paper Pad by Recollections
Ribbon - Recollections
There you have it! One of my first (of what would become very very many) eCraft projects!
Now for some eCraft News::::

Hope you all have a great and not so manic Monday!
(Sorry the song is stuck in my head! ;-) )
- Kim
Saturday, October 6, 2012
Mad Hatter Day / World Card Making Day!
So today is World Card Making Day! It's also Mad Hatter's Day!
Over at Bombshell Stamps, we are participating in the World Card Making Day Blog Hop, and it was decided that the Bombshell Girls and Pin-Ups would create cards that merged World Card Making Day and Mad Hatter's Day together. A pretty fun concept I think!
So without further ado, here is my card using the "Love and Luck" Stamp Set from Bombshell Stamps.

Using SCAL 3 basic shapes, I made the top hat (card base) and hat band SVG and cut it out with my Silhouette Cameo. The rose is from SVG Cut's Kit "Crush On You Boxes", which I reduced to a smaller size. The hat band and rose were embossed with embossing folders by Darice and Sizzix and embossed using the electronic eBosser by Craftwell. The stamps from Bombshell Stamps Love and Luck Set were colored in with Copic Markers.

Now please head on over to the Bombshell Stamps Blog and check out all the seriously awesome cards made by the Bombshell Girls and Pin-Ups!!! And don't forget to hop along with the World Card Making Day Hop! I'm sure there will be tons of amazing inspiration along the way!
Thanks for stopping by today! If you have any questions/comments please leave them below.
- Kim
Tuesday, October 2, 2012
Updates...
Hi Everyone!
My apologies for not being around much, I have been resting and re-couping after having a bout of pneumonia. I am feeling better but still not quite at 100 percent. Thank you to everyone for your get well wishes!
As you can see, I don't have a Craftwell eCraft/eBosser DT project up today as Lyssa has covered for me this week. Thanks Lyssa!!! Make sure you check out her super cute project here at the Craftwell Blog! Seriously, her project is adorable!
Also, I have some exciting news!
I am now a Bombshell Girl! Check out the list below to visit all the Bombshell Girls and Pin-Ups blogs. These ladies are so talented and so much fun! And don't forget to check out the Bombshell Stamps Sets!
The Bombshell Girls
Alaine Medio
Alison Heikkila
Emily Wilson
Jodi Elam
Glittery Katie Shanahan-Jones
Kelli Green
Kim Gaughan, aka Crafty Pink Anchor
Sparkly Mary Guth
Rachael Brackett
Stempelientje
Susie Little, aka LittleMe
Torrey Moseley
Kathi Rerek
Our Monthly Pin-Ups, aka Guest Designers:
Ms. October: Alex Lundgren
Ms. November: Cassie Schissel Barber
Ms. December: Monika Franziska
Ms. January: Jenn Borjeson
Ms. February: Christine Garner
Ms. March: Marie Carlsson
Hope you are all having a great day!
- Kim
Subscribe to:
Comments (Atom)